Tuesday, March 4, 2014

5 Easy Steps to DIY Wool Dryer Balls

Have you ever seen wool dryer balls in the store or online?  They cost anywhere from $12-$20 for a set of 4-6 dryer balls.  Let me tell you how they work!  When you dry your clothes, instead of using fabric softener sheets you throw in 4+ wool dryer balls.  The weight of the balls will lift and separate clothing during the cycle.  When clothes are separated like this they will dry much faster!  You can even add drops of pure essential oils to the wool if you'd like to add some scent to your laundry.  Pure lavender oil is fantastic for this!   

Please note, this project calls for 100% wool yarn.  If you cannot use wool, stay tuned because I'll be making some cotton dryer balls in the near future as well.  I made some dryer balls using Fishermen's wool yarn, and also some Patton's wool roving yarn.  The results were different with each type, and I'll explain the differences at the end of the post.  


Supplies needed:

100% wool yarn 
Nylon pantyhose or trouser socks
Ribbon or acrylic yarn
Yarn needle
Scissors

1.  You will wrap your yarn into a tight ball about the size of a tennis ball (or bigger if you choose).  Below I will show you how I started the ball.  I wrapped some of the yarn around my fingers, then pinched the middle and started wrapping the yarn around the center.  From that point, you can just start wrapping the yarn all around into the shape of a ball.  Be sure that you've wrapped it tightly.  


2.  Now, you should have a yarn tail about 6 inches long.  You will thread the end of the yarn through a yarn needle.  Insert the needle into the ball and push it through to the other side.  Repeat this step until you've woven as much of the tail into the ball as possible.  Snip any remaining yarn off with your scissors.  


3. Next, take a leg of the pantyhose or trouser sock and place a dryer ball into the toe.  You will tie off the sock immediately after the ball using your ribbon or acrylic yarn.  Then, insert the next dryer ball on top, and tie it off again and repeat the same steps with any remaining dryer balls. 


4.  Wash the sock/dryer ball combo in HOT water with a COLD rinse.  Do not remove the dryer balls from the sock.  If your yarn ties have loosened you can tighten them up before the next step.

5.  Dry your sock/dryer ball combo on permanent press or the towel setting. 

The Fisherman's Friend wool yarn felted using these steps, but the wool roving yarn felted much better. You can see how the strands of yarn meshed together better using the Patton's wool roving yarn. These wool dryer balls will last for years!  If they start to come loose, you can re-felt them by using the same method that you used the first time.  Simply place them in a sock or nylon, tie off, wash hot, rinse cold, and dry!  


By using the wool dryer balls you can save money on fabric softener sheets, and on gas or electric because you'll have shorter drying times!  It doesn't get much better than that!


Thursday, February 27, 2014

Crafts Gone Wrong!

Have you ever had a craft disaster?  Everything on Pinterest looks so perfect and easy, and then you try to make it yourself.  Some of my most epic craft fails usually started with, "Maybe I could just..." 

Yes, I'm crafty.  Yes, I have a decent amount of common sense.  But sometimes, it seems like those two parts of my brain are giving each other the silent treatment.  Recently, I posted the super cute Scrabble inspired word art.  Love that project, so personal and looks so nice on the wall.  Then I thought I would get "smart" and make the wooden tiles myself.  

See, when I purchase them there is no guarantee of any quantity of letters.  Sure, there may be 60 tiles in the bucket but I really don't need 30 of them to be U's and W's!  My handy dandy husband was kind enough to offer his time and cut some tiles for me (for the safety of his tools!).  

Next, I poured over the internet to find out what font would be the best match.  Use a stencil?  No.  Stamps?  Maybe.  Nope, no stamps in the font that I need.  Wait, maybe I can make my own stamps!  (This is where things took a turn for the worst.)  

Off I went to my favorite enabler, I mean craft store.  Felt letters, a sheet of foam, a block of floral foam, an ink pad, and bottles of acrylic paint.  I don't know what I was thinking, but I will never get those three hours of my life back!


craft fail


  Printable decal sheets have been delivered and I will make attempt number 2 at the wooden letter tiles.  I'm keeping my glue sticks crossed!    


Monday, February 24, 2014

Beach Themed Wedding Decor Using Only 5 Supplies!

For an upcoming vow renewal, these beach themed votives will give just the right touch of coastal charm.  


beach themed wedding decor

You won't believe how easy these are to make, and they will look like you spent a lot of money on them!  

Supplies you will need:

Votive candles 
Glass votive holders
Twine
Seashells
Hot Glue

I purchased the candles I purchased came with the glass votive as a set.  

First, wrap your twine around your votive.  You may decide that you want to tie it in a bow, and if you do, you will need to measure the amount of twine that you need first.  


beach themed wedding decor


Attach your twine with a drop of hot glue.  

Any seashells will work.  Choose a variety or stick with one type if you'd prefer.  For this tutorial I'm using sand dollars and small starfish.  

Use a drop of hot glue and place it onto your twine where you'd like to attach the seashell.  Gently push the seashell into place and allow to cool.  

Now that the votive is completed, I will be placing a little sand in a pint sized mason jar and gently place the votive on top of the sand.  You can tie a ribbon or raffia around the mouth of the mason jar that coordinates with your wedding colors if you'd like.  


beach themed wedding decor


beach themed wedding decor


These votives will look beautiful inside some white lanterns also!  


beach themed wedding decor

There you have it, a quick and easy way to make your own beach themed wedding decor!


beach themed wedding decor


Saturday, February 22, 2014

Scrabble Inspired Wall Art

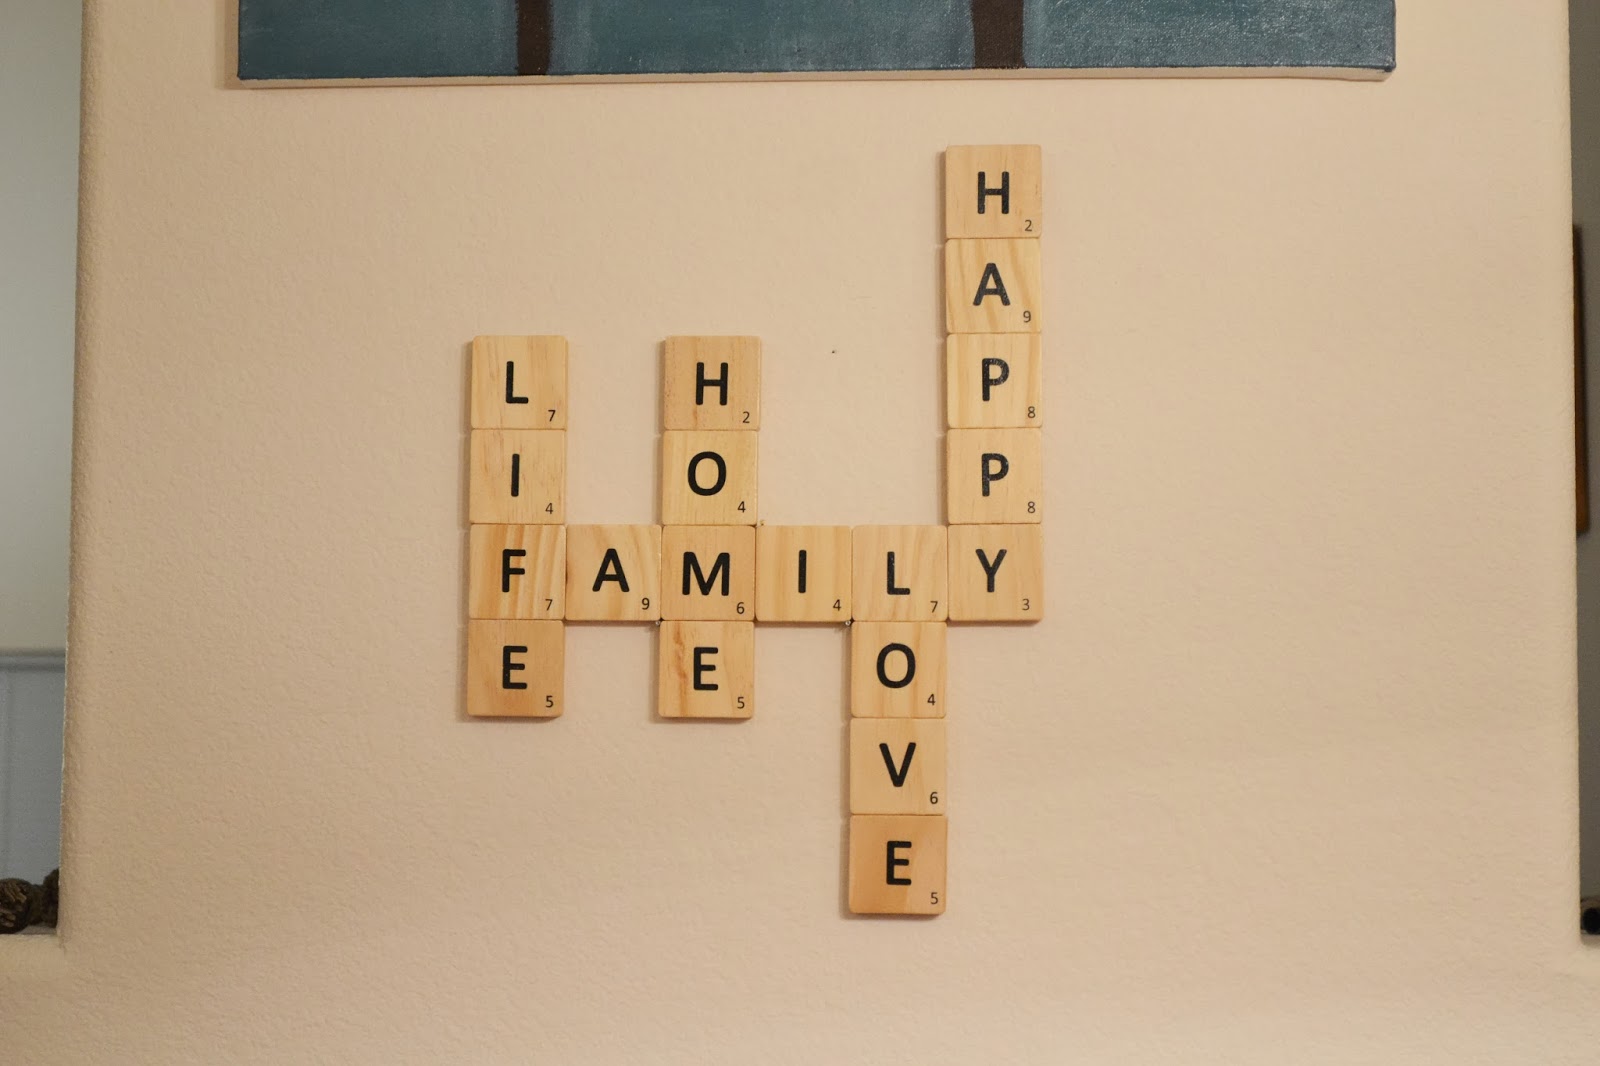
A few days ago I came across these Scrabble inspired letter tiles.  I grabbed a bucket of them so that I could make a little wall art for our dining room.  


scrabble letter tile art

With help from my husband, we came up with this nice set of words that remind us of our family.  I think it turned out so well!  I used some permanent adhesive to bond the tiles together, and rested the finished art on two small nails in the wall.  I just love it so much, it really adds a special touch to our space. 

After we made the "Family" wall decor, we decided that we could come up with some others while we had the extra tiles.  (Ok, I confess...I was so excited that I went back and bought another bucket of tiles!)  Below I've posted some of the wall art that we ended up with.


scrabble letter tile art


scrabble letter tile art

scrabble letter tile art

scrabble letter tile art

Just thought I'd share a little unexpected project with you!  The wall art has also been listed in my Etsy shop if anyone would like one for themselves!

Friday, February 21, 2014

Big Craftsy Sale!


Save Big at Craftsy!
Heads up Craftsy fans...Craftsy wants to help you escape the ordinary and create the extraordinary! Enjoy up to 80% off all inspiring project kits and supplies. Shop now to find your next amazing project during the Stash Of Possibilities Sale. Hurry, offer ends at 11pm PST on February 24, 2014.

Save up to 80% on Yarn at Craftsy!
Save up to 80% on Fabric at Craftsy!

**This post contains affiliate links and I will be compensated if you make a purchase after clicking on my links

Thursday, February 20, 2014

Scrapbooking Stash Buster!

Have you accumulated a ton of scrapbooking supplies?  Is your stash overflowing?  Or do you admire the scrapbooking section at the craft store, but don't feel inspired to actually create a scrapbook?  My answer to all three of those questions is, YES!  

In addition to paper beads 1 and paper beads 2, I have another idea here to put some of your paper to use.  


letter decor scrapbook paper

Supplies:
Scrapbook paper
Pencil
Adhesive
Gloss / Glaze
Scissors
Embellishments (yarn, raffia, buttons, stickers, ribbon, washi tape etc)

First, start with your favorite papers.  Pick out 3-5+ large sheets of paper, or a bunch of the smaller ones. 

letter decor scrapbook paper

Next, you will need a wooden or a cardboard letter in the initial of your choice.  I used large papier mache letters because that's all that was available in the size that I was hoping for. 

You can patchwork strips of paper onto your letter, or you can trace and apply like I've done below. 


letter decor scrapbook paper


letter decor scrapbook paper


Use your adhesive to attach paper, and try to join the seams as closely as you can.  Don't worry if it's not perfect, I will show you a crafty way to pull it all together!

Once you have your paper attached, take you letter to a well ventilated area and apply your gloss or glaze.  Allow to dry 24 hours.  

While your letter is drying, you can plan your use of embellishments! You can use these to help cover seams and make your initial look really chic.  I had a seam that ran along the edges of my letter because I chose to lay the paper flat on all sides, instead of wrapping strips around the letter.  Then I was facing the challenge of hiding those darn seams!  

Since I have a stash of yarn, I decided to braid some to glue along the edge of the letter.  To measure the yarn, I simply laid it along all of the edges that I wanted to cover, and added a few more inches.  I cut three equal strings and braided away!  


letter decor scrapbook paper


Now that your letter has time to dry, glue the embellishments on and again allow some drying time.  


letter decor scrapbook paper

letter decor scrapbook paper


Voila!  You have put your scrapbooking stash to use, and have a crafty gift that can easily be customized as you see fit!  These would look great in a baby nursery, or even in the middle of your living room wall with framed photos surrounding it!  How would you decorate your letter?

Tuesday, February 18, 2014

Free Digital Paper Download!

Hey everyone!  I've been playing around with some digital paper, and wanted to share some of the files that I've created.  Here is a link to the dropbox file, feel free to download and use however you'd like!  

Have a great day!

https://www.dropbox.com/sh/xm0sk5q0vraaso9/5-aR-XOsht